
Who can use this feature?
Available on:
 All Culture Amp subscriptions.
You can import employee data directly from ADP Workforce Now into Culture Amp using a secure, one-way API connection. This ensures your employee list and demographics are always up-to-date.
Data Flow: Employee Data flows from ADP Workforce Now into Culture Amp (one-way sync). Changes made in Culture Amp will not sync back to your HRIS.
![]() Initial Setup Timeframe: Establishing a connection with ADP Workforce Now typically follows a target window of 2–4 weeks. Timelines are good-faith estimates and fluctuate based on the complexity of your data model and the responsiveness of internal technical stakeholders during iterative testing.
Initial Setup Timeframe: Establishing a connection with ADP Workforce Now typically follows a target window of 2–4 weeks. Timelines are good-faith estimates and fluctuate based on the complexity of your data model and the responsiveness of internal technical stakeholders during iterative testing.
Choosing Your Integration Method
We offer two primary ways to connect your employee data. The table below briefly outlines both and should help with the decision on which is the best approach for your organization:
Method | Type of Import | Best For | Key Difference |
Full Integration (API) | Full Employee Import | Organizations seeking real-time, daily automation of all employee data that the API supports. | Data transfer is handled automatically via a secure API connection. Users with an End Date in the HRIS become former employees instantly upon sync. If a user is simply removed from the sync report without an End Date, they will remain "Active" in Culture Amp until a manual sync is performed by our Culture Amp Support team. Properly terminating employees in your HRIS with an End Date is the only way to guarantee automatic deactivation. |
Partial Employee Import | Organizations that need complete control over file creation, have unique filtering requirements, or when the ADP Workforce Now setup requires Two-Factor Authentication (2FA). | You generate a file and securely transfer it to us at scheduled intervals. Users missing from the file are ignored unless you include an end date. |
API Integration Checklist
Access Requirements & Terminology — Prerequisites and system logic.
Step 1: Connect & Authenticate — Locating and entering your API credentials.
Step 2: Field Mapping — Aligning your ADP Workforce Now demographics with Culture Amp.
Step 3: Activate Integration — Establishing the technical connection.
Step 4: Run Your First Sync — Reviewing and importing employee records.
Troubleshooting & FAQs — Solving errors, duplicates, and sync blocks.
Before You Start: Access Requirements & Terminology
To set up the connection, you'll need:
Access to your ADP instance with Marketplace Administrator privileges to create the necessary application profile and configure permissions (see the Permissions section below).
Access to Culture Amp with Account Administrator or Employee data administrator permissions.
Important Considerations & Data Limitations
Important Considerations & Data Limitations
Supported ADP Solutions:
* ADP Workforce Now (US only)
ADP Run
ADP Decidium
Not Supported:
* ADP Workforce Now NextGen: This integration is not compatible with customers using ADP's newest NextGen platform.
ADP Canada: This is a separate product and is not supported via the API. We recommend using our custom SFTP method instead.
The "Report-Based" Sync Rule: Unlike other direct API integrations, this connection specifically targets ADP’s Standard Employee Census report. The integration requires the "out-of-the-box" version to function. Do not rename, hide, or move columns within this report in ADP. Because the API "expects" the exact default layout and header names, any structural customizations or layout changes will cause the data sync to fail.
Security Question & MFA Incompatibility: If you encounter a "Not enough security questions" error during setup, it indicates your ADP configuration requires an "interactive" login. Some ADP instances mandate a Two-Factor Authentication (MFA) code or multiple security questions for every connection attempt. Because our sync is automated and runs in the background, it cannot respond to these dynamic prompts. In these cases, you must switch to an SFTP connection. Simply reply with "Ask a Person" in a support conversation to have your existing API setup removed and transition to SFTP.
Derived Fields: The API cannot read Derived Fields (calculated fields in ADP). Only raw data points present in the default Census report are supported.
Project Planning & Timelines: We recommend planning for a setup and validation period of 2–4 weeks. For highly customized environments or those requiring MFA/2FA troubleshooting, this process can extend to 4–6 weeks or longer. Because data access is limited to the standard fields available in the ADP Employee Census report, this timeframe allows for the necessary iterative testing to confirm your demographics are importing as intended. Actual completion dates are subject to internal security configurations and the success of the API "handshake."
Employment Status Mapping: To ensure your "Active" and "Former" lists are accurate, the integration automatically looks at the workerStatus field in ADP. Please ensure this field is populated for all users in ADP to avoid sync errors.
Terminology Breakdown
Terminology Breakdown
Term | Definition |
Practitioner | The specific administrative super-user role in ADP required to grant third-party access. |
Employee Census | The specific out-of-the-box report that acts as the "data source" for this integration. |
Consent Manager | The area within ADP where you must approve the "Merge" (Culture Amp) application request. |
Required Permissions & Rationales (Technical)
Required Permissions & Rationales (Technical)
Permission/Role | Needed in ADP Workforce Now | Rationale |
Practitioner Role | Security Management > User Access | Essential: Only a user with the Practitioner role can authorize the "handshake" between ADP and Culture Amp. |
View Standard Reports | Reports & Analytics > Access Permissions | Required so the integration can "run" the Standard Employee Census report to pull your demographics. |
Marketplace Data Connector | ADP Marketplace | Allows you to approve the "Merge" (Culture Amp) application request in the Consent Manager. |
Sensitive Personal Information | On-Screen & Reports (No Masking) | Important: If fields like Date of Birth are "masked" in ADP, they will sync as blank in Culture Amp. Set these to "No Masking" for the service account. |
![]() Tip: For the full list of fields and objects accessed by the connector, please refer to the ADP Workforce Now API Reference Guide.
Tip: For the full list of fields and objects accessed by the connector, please refer to the ADP Workforce Now API Reference Guide.
Step 1: Connect and Authenticate Your ADP Account
Sign in to Culture Amp with an account that has Account Administrator or Employee data administrator access.
Navigate to your Settings > Account > Integrations page.
Select ADP Workforce Now from the list of integrations and click Continue Setup.
On the subsequent screen, under the Choose how you would like to authenticate section:
Select: Use my username and password (select this option to use the API).
Click I am an admin to confirm your ADP administrator permissions.
![]() Note: Ignore the Custom reports via SFTP (recommended) option. The SFTP setup flow through this button is not fully supported and does not function correctly. If you need to use SFTP, please refer to our custom SFTP option.
Note: Ignore the Custom reports via SFTP (recommended) option. The SFTP setup flow through this button is not fully supported and does not function correctly. If you need to use SFTP, please refer to our custom SFTP option.

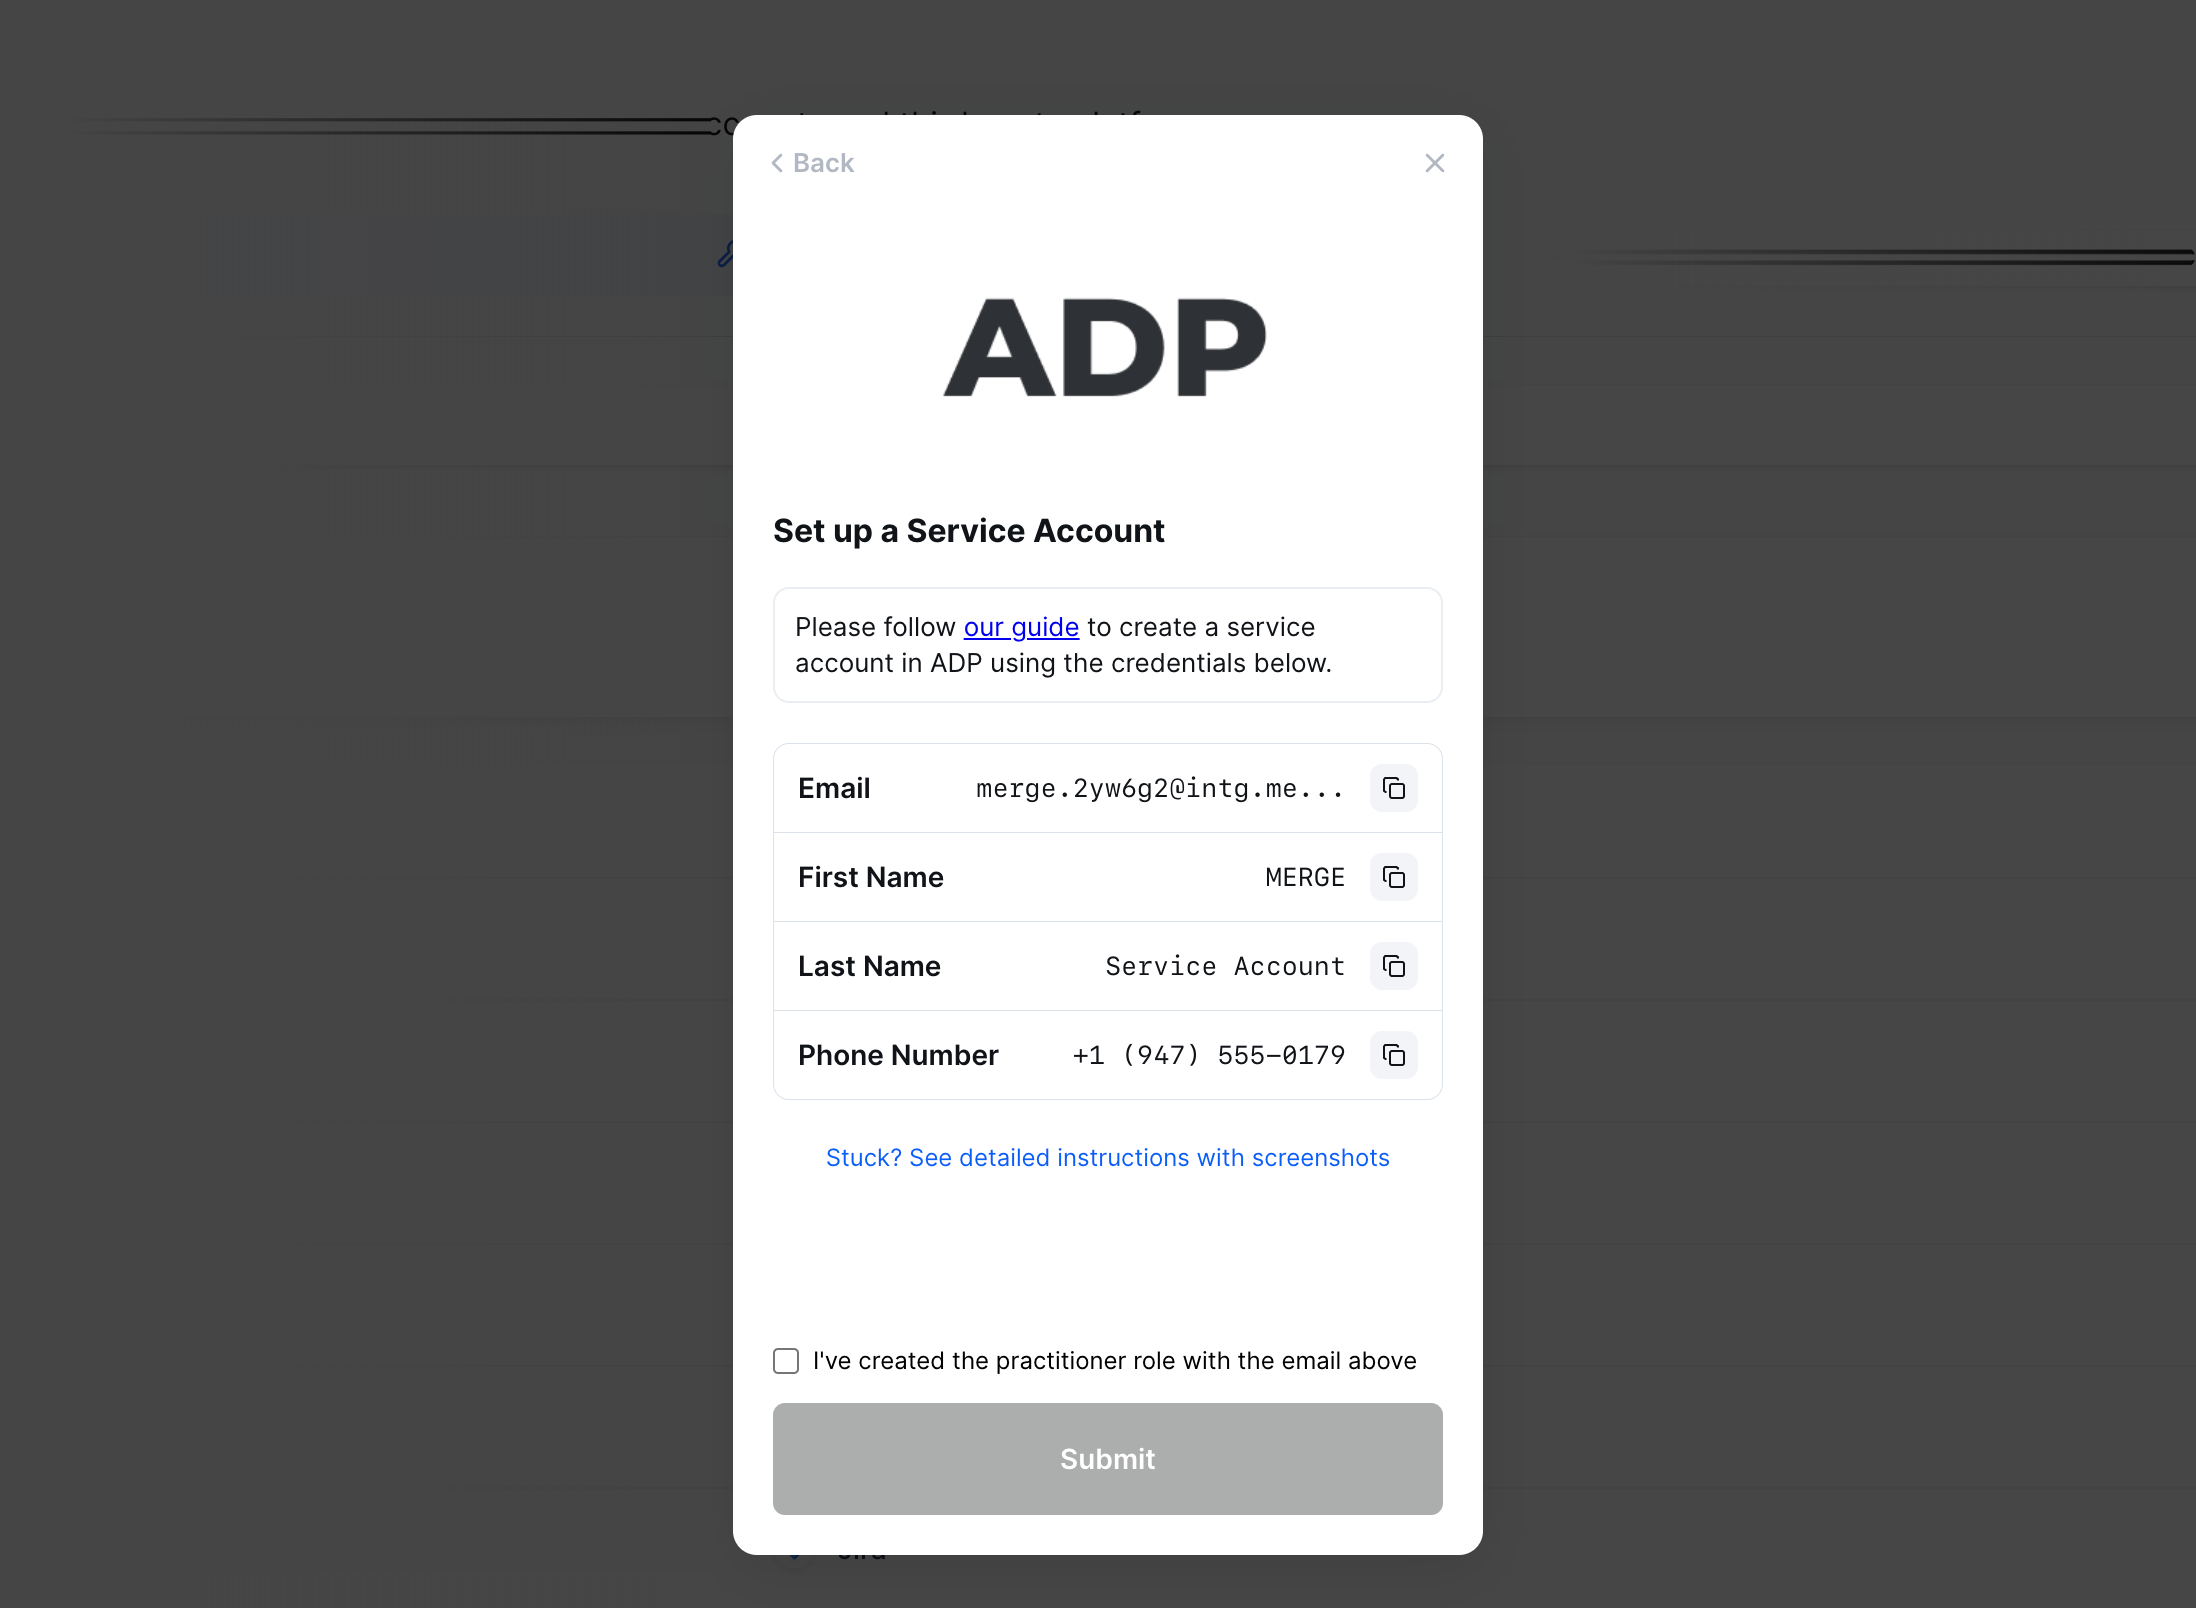
Once these steps are completed, you'll see the integration setup dialogue that provides the necessary credentials for the service account.
Set up ADP Role Authentication
To grant permission for accessing your data from ADP, you must create a specific service account in your ADP instance using the values displayed on the Culture Amp setup screen:
Create a service account in your ADP instance, using the account values displayed in the integration setup dialogue.
Refer to our detailed guide to create a service account using the credentials.
You must create a new service account in ADP before clicking Next or this connection will be incomplete.
Once the service account is created in ADP, tick the I've created the practitioner role with the email above checkbox.
Click Next to proceed with the integration setup.
🔑 How to Create a Service Account
🔑 How to Create a Service Account
![]()
![]() Note: The steps below are sourced from Merge, our integration partner. We recommend checking their official guide for the most current instructions: Merge ADP Workforce Now Account Linking Guide.
Note: The steps below are sourced from Merge, our integration partner. We recommend checking their official guide for the most current instructions: Merge ADP Workforce Now Account Linking Guide.
Overview
This guide will walk you through creating a practitioner role within ADP Workforce Now to link your account.
Prerequisites
Please ensure you fulfill all the requirements to set up the integration:
You are an Administrator in your company's ADP instance, or someone has shared their access with you.
You do not use ADP Workforce Now Canada
Instructions
Step 1: Create a profile with access to reports
1. In your ADP Workforce Now account, go to Setup and find Access Permissions.

2. Then click Manage Profiles -> Create Profile

3. The Name field can be any value but the Role must be "Practitioner"

Step 2: Give your service account access to securely sync your data
Clicking "Create profile" in the previous step will open up a new screen.
In Menus & Features, go to Reports & Analytics to make sure the following boxes in are checked. This is REQUIRED!
My Reports
All Reports
My Standard Reports
View
Reports Output
Reports Scheduled
Reports Dashboard
Reports Dashboard
Standard Reports
All Reports (only grants access to report types that are otherwise checked)
Personal & Employment
If you need additional data for the integration, select the following under Standard Reports
(optional) Benefits for Benefits data
(optional) Pay Statement History for Pay data
(optional) Time Off for Time Off data

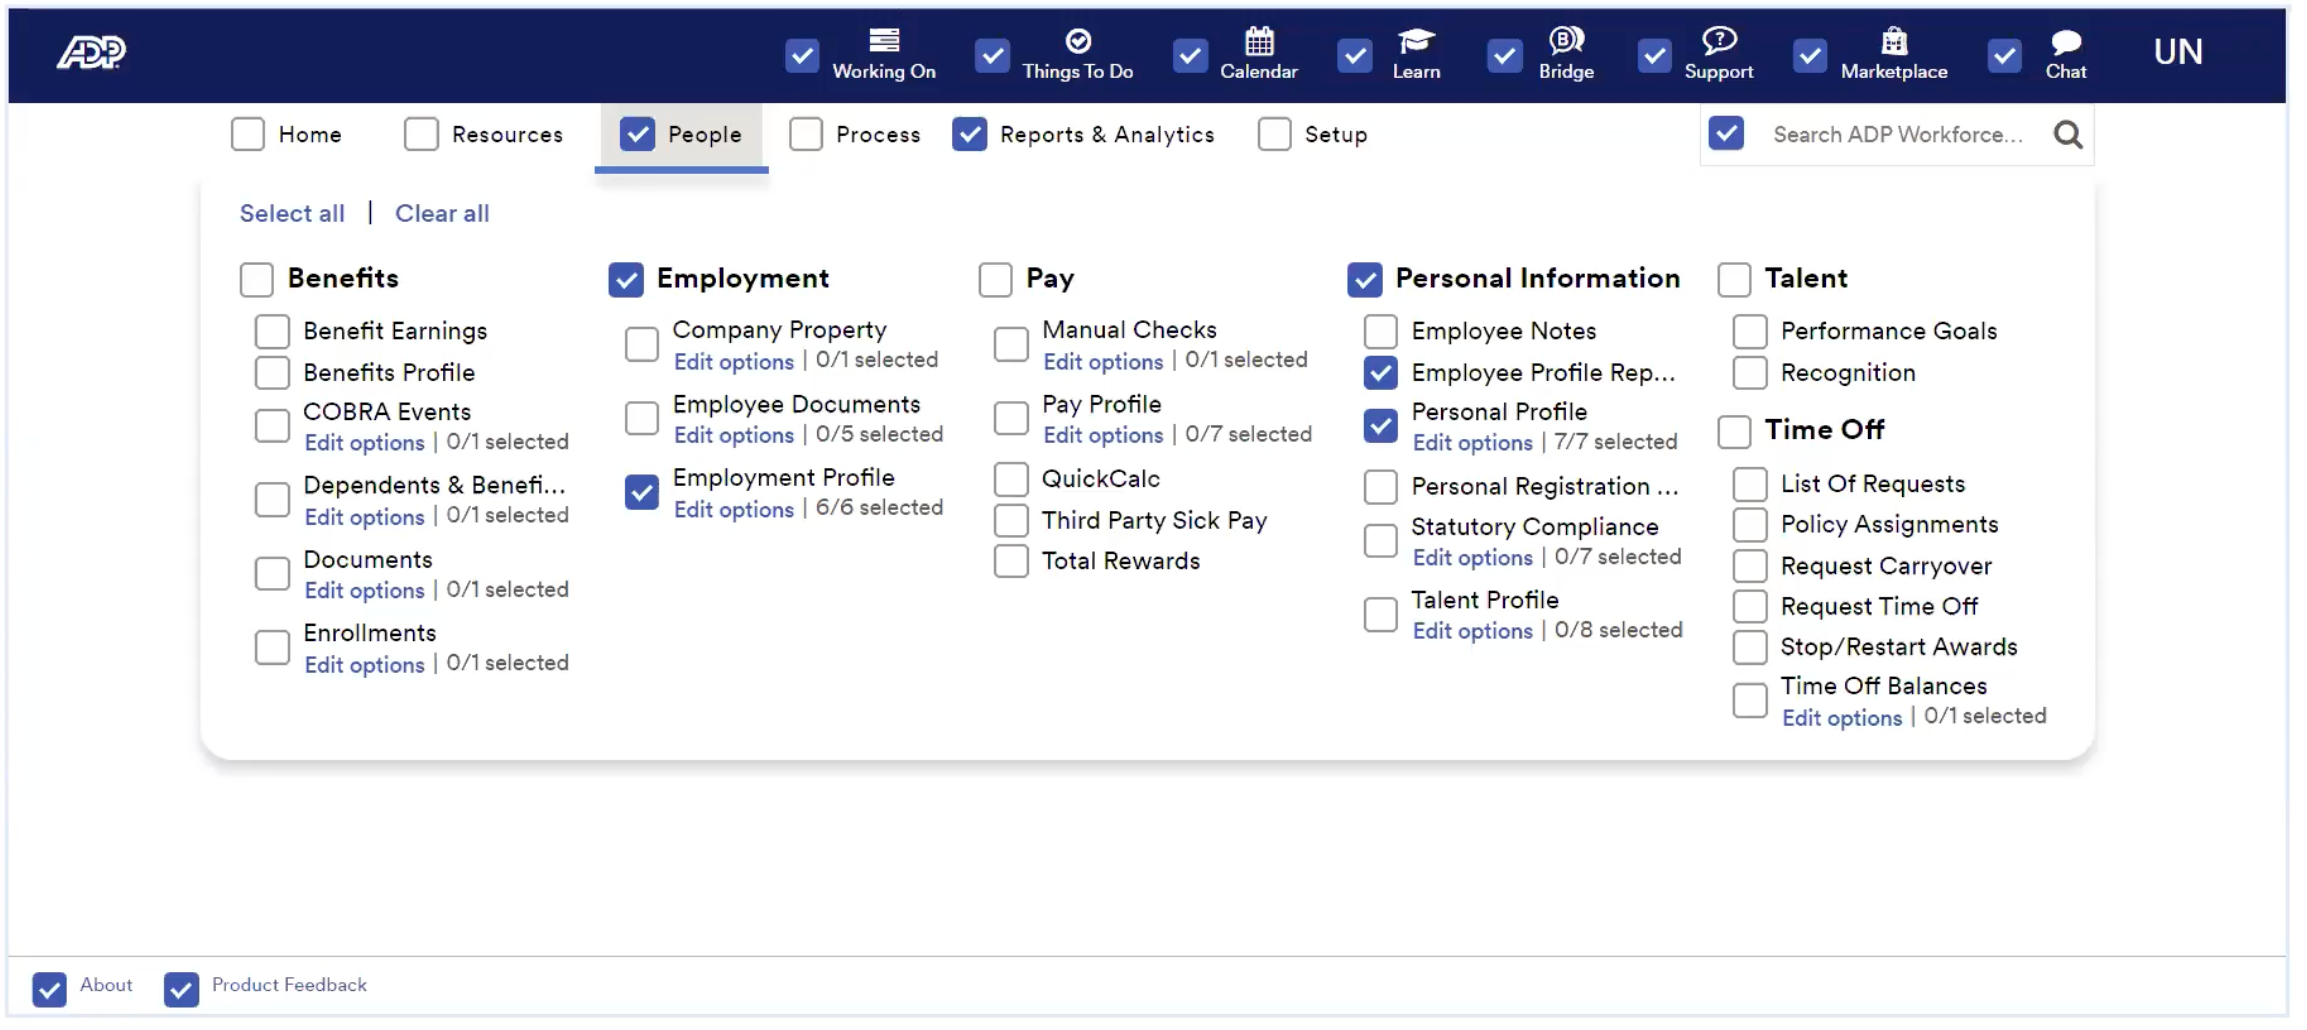
Next, go to People and make sure these boxes are checked. This is REQUIRED!
Employee Profile Report
Employment Profile
Personal Profile
(optional) If you need Payroll data, select Pay at the top
If you need Time Off, Time and Attendance, Payroll, or Benefits data as part of this integration:
All People permissions: Click SELECT ALL in the top left. This will allow the integration to sync data pertaining to Time Off, Time and Attendance, Payroll, and Benefits information
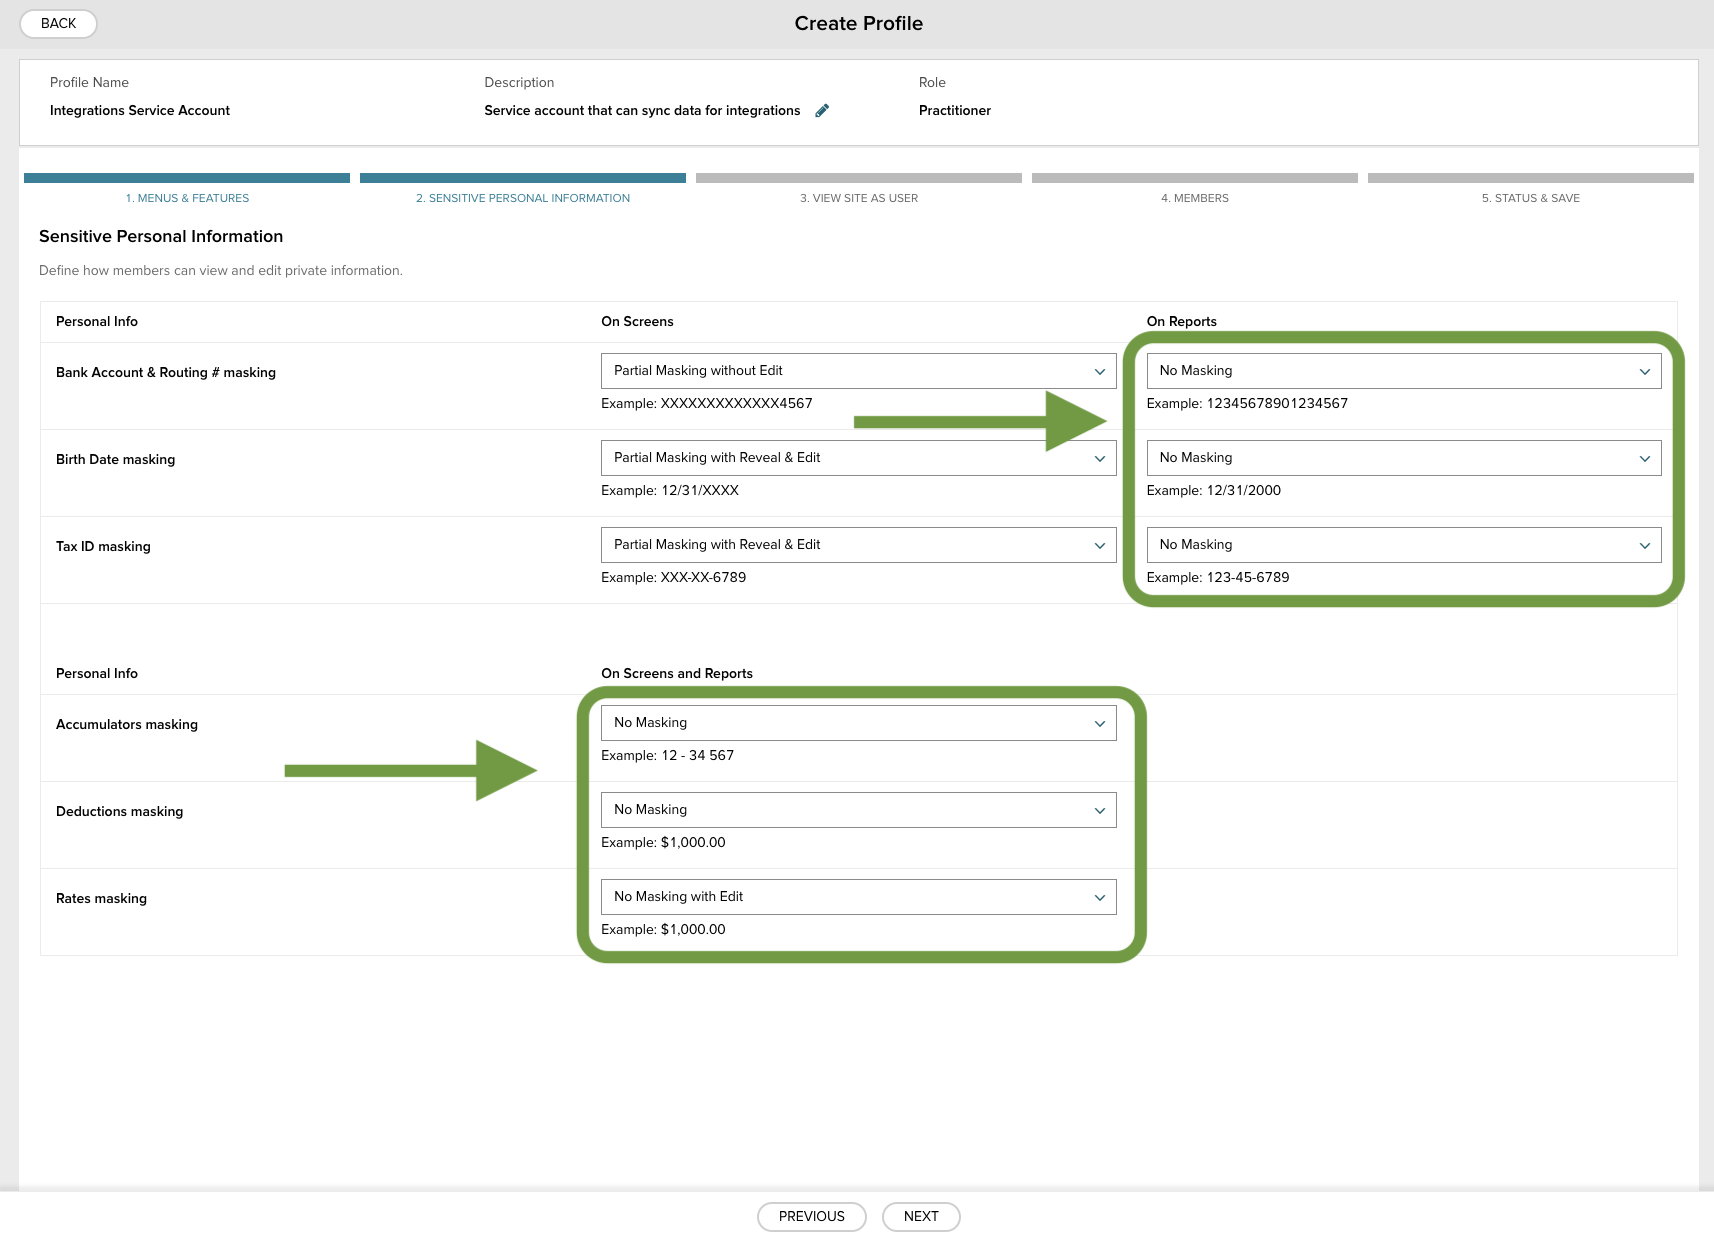
(optional) In Sensitive Personal Information, go to On Screen & Reports and On Reports, and from the drop down menu select No Masking, Partial Masking, or Masking. This will allow the service account to securely sync your complete data set.
If you do not want to sync over information such as Birthdate, SSN, or Bank Info, please mask this information!
Note: Rates masking will need to be set to No Masking for employment effective dates to sync.
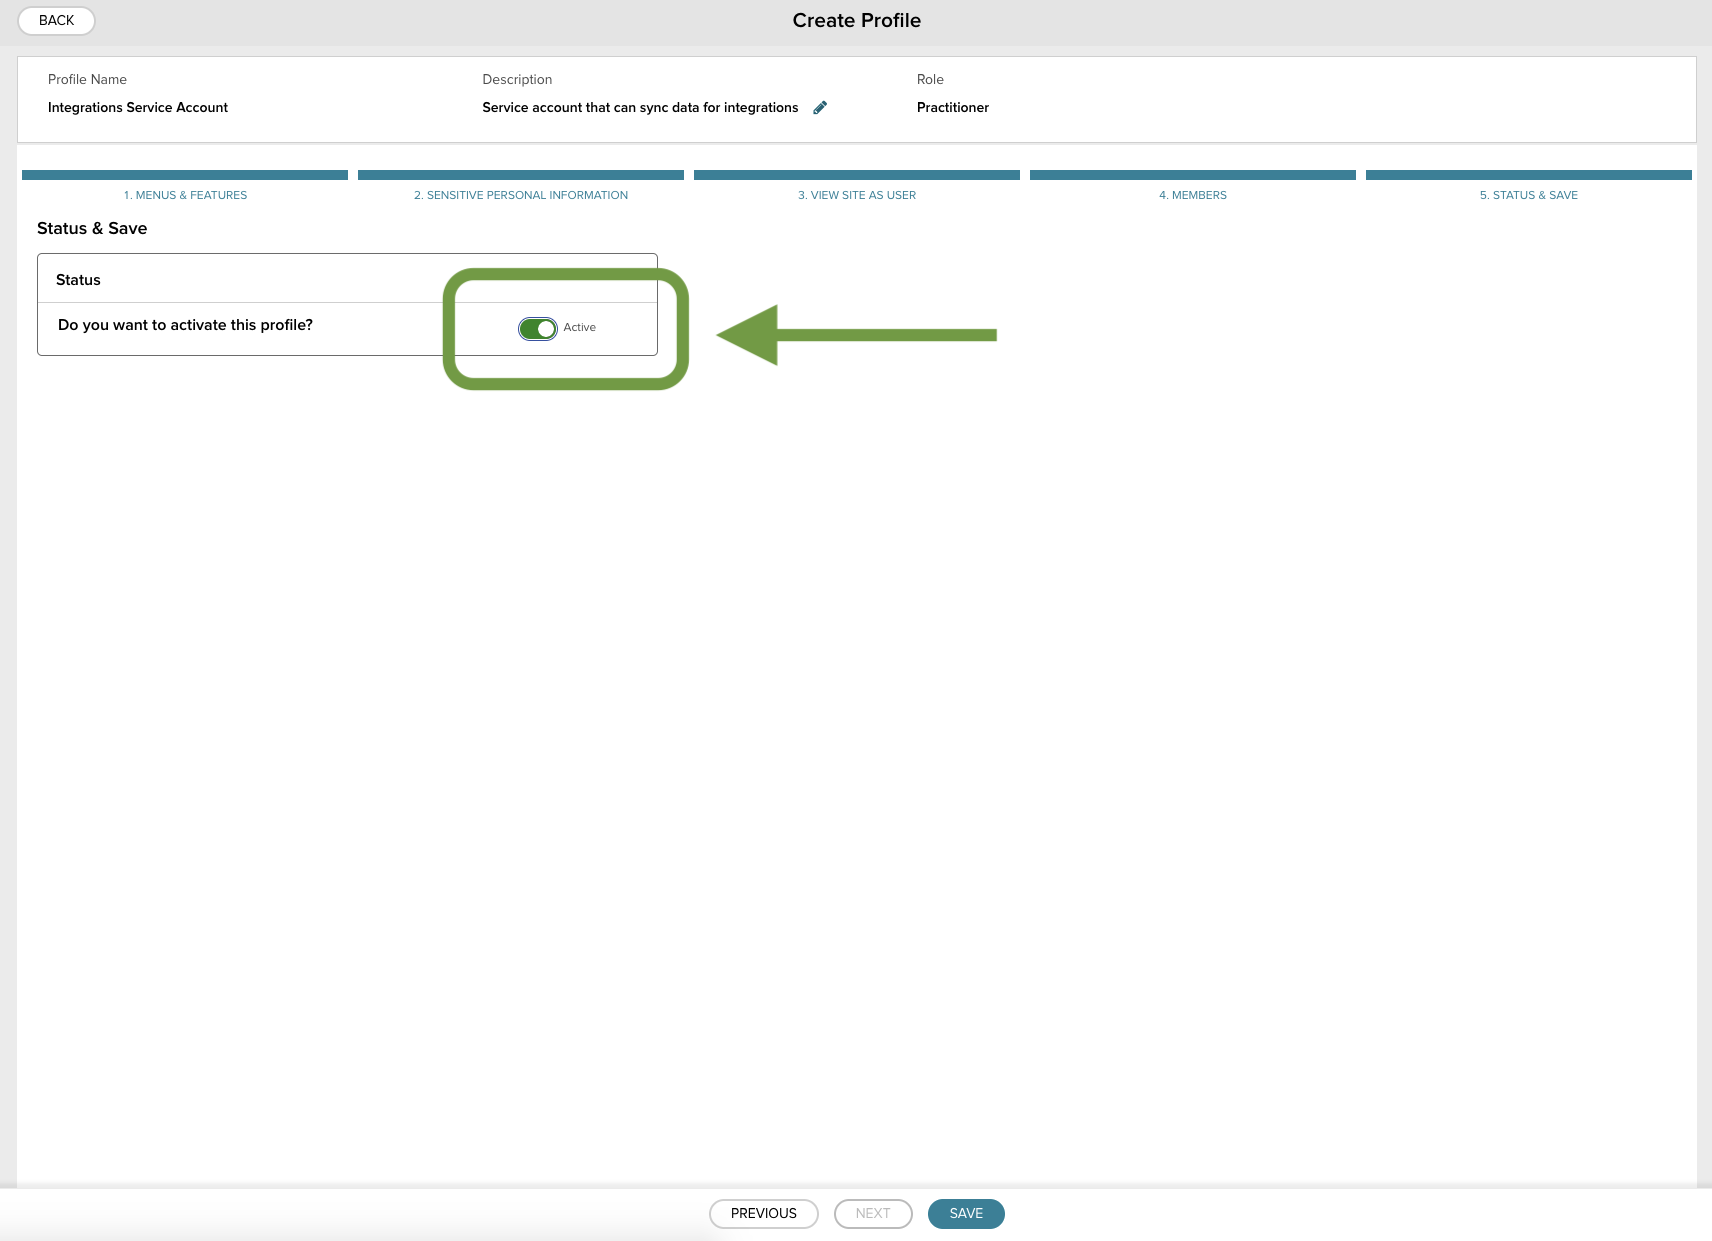
On the last screen, Status & Save, activate the profile, and then save it below:
Step 3: Create a new user and assign it to your "Integrations Service Account" profile
From the Setup menu, select Security Management

In Security Management, click People, then Manage Users and + to add a user.

Fill in the fields on the Add a New User page, using the fields displayed to you in the linking flow. See an example below:

Click Continue.
In Step 1 "User Information", set the User Type to the “user is an independent contractor...” option, and set the User Role to “Product User”.

In Step 2 "Services":
Assign the profile by selecting WFNPractitioner in the "Available Service Profiles Box" and moving it to the "Selected Service Profiles"

Proceed through Step 3, and confirm the new user.
Please note that a Username will be Auto-Generated for this person. That is completely okay and expected!
Step 4: Connect the service account user to the service account profile
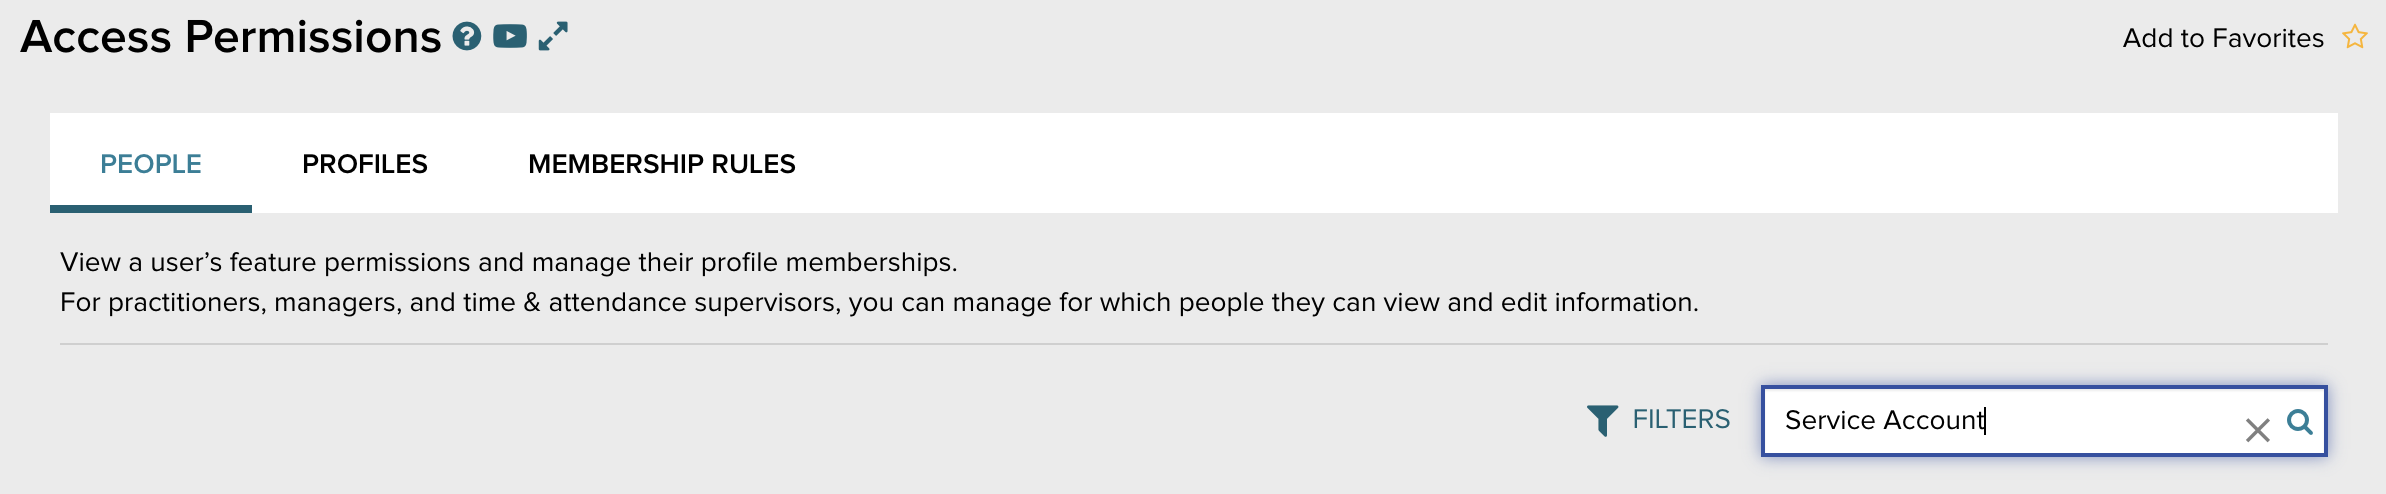
Go back to your Workforce Now portal, and go to the Access Permissions page like before to find the Manage People page.
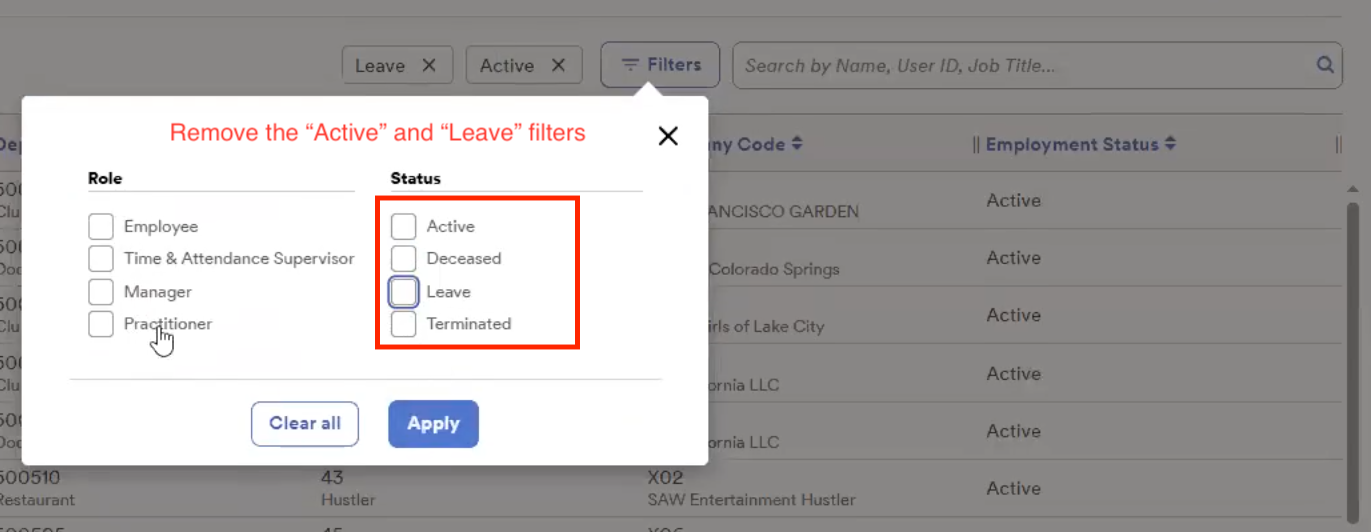
Search for Service Account to pull up the new user (that should be its last name). If the service account is not showing in the search, click the "Filters" button next to the search bar and uncheck any active filters (typically "Active" and "Leave").
Click the user to pull up User Access Permissions, and select Manage Profile Memberships. Add the Service Account Profile that you created to the user. Click Save

Now that the Service User has the right Profile associated, verify that the Menus & Features and Sensitive Personal Information for this user match what you set up in the Profile earlier (Step 1)
Lastly, in People Access, under Service Account Currently Has, enable View Only Access to all People (if needed, change access to people by clicking Change Access highlighted below). Click View List of Selected People, and make sure that list is not empty. This is needed to view employees (including terminated)

Step 5: Return to your linking flow and authenticate
When that is all completed, return to the linking flow and click Submit. You should see a success message indicating your integration is all set. If the service account needs modification, you will be instructed to try again with the same account values displayed to you!
Having trouble authenticating?
Our recommendation is to delete the created user and restart the process from Step 3. ADP often encounters issues when updating the information of the prior service user, so we recommend starting from scratch.
Step 2: Setting Up Demographic Field Mapping
Once you have authenticated with ADP Workforce Now, you will be prompted to map the demographic fields you would like to import into Culture Amp.
![]() Note: Core demographic fields map automatically and should not be manually configured unless instructed by a Culture Amp specialist. Please note that once these fields are set up, they cannot be edited or deleted. If you need to make changes, reply with "ask a person" in a support conversation to speak with a specialist.
Note: Core demographic fields map automatically and should not be manually configured unless instructed by a Culture Amp specialist. Please note that once these fields are set up, they cannot be edited or deleted. If you need to make changes, reply with "ask a person" in a support conversation to speak with a specialist.
Core Demographics: Automatic Mapping
Core Demographics: Automatic Mapping
This table is intended for your technical ADP administrator. The following fields sync automatically from the Standard Employee Census report via the GET /employees reporting endpoint.
![]()
![]() Note: While the "Typical ADP Workforce Now UI Label" shows the common reference field in ADP, exact UI labels and underlying field names may vary by tenant and configuration.
Note: While the "Typical ADP Workforce Now UI Label" shows the common reference field in ADP, exact UI labels and underlying field names may vary by tenant and configuration.
Typical ADP UI Label | ADP Endpoint (Data Location) | Culture Amp Field (The Destination) |
Work Email |
| Email (Unique Identifier) |
Associate ID |
| Employee ID (Unique Identifier) |
Legal Name |
| Name |
Preferred Name |
| Preferred Name |
Birth Date |
| Date of Birth |
Hire Date |
| Start Date |
Termination Date |
| End Date |
Reports To Email (Work Email of the referenced Manager) |
| Manager Email (Hierarchy Demographic) |
Custom Demographics: Manual Mapping
Custom Demographics: Manual Mapping
If you track additional employee data in ADP Workforce Now that you want to use as demographics in Culture Amp, follow these steps to set up custom mapping.
Step 1. Map Fields
Now that the initial authentication is complete, on your Integrations page, click Map fields.

Step 2. Select the Data Model for the Target Field
From the target field dropdown, select Employee.
Step 3. Set Details for the Target Field
Specify the details for the field you want to target (e.g., pronoun).


Step 4. Choose the Matching Field from ADP
Select the matching field from ADP and click Save.

Step 5. Save Mappings
You can either Save mappings or click the + Field Mapping button to add more.

![]()
![]() Tip: Not all demographic fields can be synced via the API due to API limitations (specifically, access is limited to fields in the Employee Census report). If you are unable to map a required demographic, your options are:
Tip: Not all demographic fields can be synced via the API due to API limitations (specifically, access is limited to fields in the Employee Census report). If you are unable to map a required demographic, your options are:
Use an alternate field that contains similar data.
Manage the demographic directly in Culture Amp via manual imports or via the custom SFTP option.
Excluding Employees (Optional)
Excluding Employees (Optional)
If you'd like to exclude specific employees from your ADP integration, you can do so after the integration has been successfully set up by utilizing the workerStatus field.
The exclusion logic works as follows:
Existing Users: If an existing user's employment status matches the one you have set for exclusion, they will be made inactive during the next sync and marked as former users.
New Users: If they are not already an existing user in Culture Amp, they will not be imported.
This feature is useful for managing users who are no longer with the company or are on specific types of leave that should prevent their data from syncing.
Step 1. Access Data Integrations Settings
Navigate to your Settings > Account > Integrations page.
Click on the pencil icon next to edit your existing ADP integration.

Step 2. Manage Exclusions
Click on Manage exclusions.

Step 3. Select Exclusion Values
Click Select Field Values… and begin typing the field values you want to exclude by.

![]()
![]() Note: The integration keys off the
Note: The integration keys off the workerStatus field assigned to the employee in ADP. The accepted status values for this automated logic are: ACTIVE, INACTIVE, and PENDING.
Step 4. Save Exclusion Mapping
Click Save exclude to update.

Step 3: Activate Integration
After mapping your fields, click Sync and the system will run an initial sync to connect your ADP Workforce Now account details and mappings.
![]() Note: This sync does not import employee data yet.
Note: This sync does not import employee data yet.
You will see a "Syncing data" message. This initial sync can take up to 12 hours to complete, depending on the size and complexity of your ADP Workforce Now configuration.
Feel free to navigate away from the page. The process runs in the background.
The "Syncing data" message confirms the connection and mapping setup. Once this first sync completes, you can proceed to import your employee data through another sync.
![]() Note: As part of our commitment to data security, only data relevant to your import and field mappings will be stored.
Note: As part of our commitment to data security, only data relevant to your import and field mappings will be stored.
Step 4: Run Your First Employee Data Sync
Once the initial setup sync is complete, the Integrations page in Culture Amp will update. Follow these steps to run your first employee data import:
Click the Finalise sync button.
Click Get Started.
On the review page, ensure Sync is selected in the "Sync with merge" section (ignore the other options).
Culture Amp will validate the data. If there are no concerns, click Next.
Review the data: Carefully examine the review screen, which shows the number of new employees to be created, existing employees to be updated, and employees to be deactivated. If there are any issues, check the troubleshooting section below or ask our Culture Amp Product Support team for help.
Hit Import Data to pull the employees into Culture Amp.
After the import is complete, click Go to Users to review the new users.
![]() Note: If you see any unexpected numbers (e.g., too many employees being deactivated or created), do not proceed with the import. Check the Troubleshooting section or reply with "Ask a Person" in a Support Conversation to speak with a Product Support Specialist.
Note: If you see any unexpected numbers (e.g., too many employees being deactivated or created), do not proceed with the import. Check the Troubleshooting section or reply with "Ask a Person" in a Support Conversation to speak with a Product Support Specialist.
Once these steps are completed, you will see the green "Syncing data" notification appear on the Integrations page. After syncing is complete, you will see the latest sync information, including the date and time of the last sync, and confirmation that your integration is Connected on the Integrations page.
Set Up Automated Daily Syncs
Set Up Automated Daily Syncs
By default, auto-syncs are off. We recommend enabling daily syncing to ensure your employee demographics are kept up-to-date.
To enable: Go to Integrations, click on the Off button and toggle Auto-sync On.
To disable: Go to Integrations, click on the On button, then click Turn off auto sync.

![]()
![]()
![]() Note: Auto-sync won’t run if the Finalise sync step is still displayed. Click Finalise sync to finish setup.
Note: Auto-sync won’t run if the Finalise sync step is still displayed. Click Finalise sync to finish setup.
Troubleshooting/FAQs
If the fixes below don't resolve your issue, please remember that the complexity of ADP means complex mapping or sync problems often require a specialist. Please reply with "Ask a Person" in a Support Conversation to speak with a Product Support Specialist.
General Data Integrity & Import Management
The first step when investigating any data issue is to check the Import Summary Screen for your most recent import.
Go to Settings > Employee Data > Import History.
Select your most recent import to view details.
This screen provides information on the state of your integration, any specific errors, or will prompt you to run a manual sync to identify problems.

ADP Workforce Now: Integration-Specific Errors
ADP Workforce Now: Integration-Specific Errors
Issue | Cause | Suggested Fix |
Integration Blocked by 2FA | The specific ADP configuration requires Two-Factor Authentication (2FA) for connection, which the API integration cannot process. | Switch to SFTP: If your ADP setup requires 2FA and you encounter this issue, we recommend switching to a custom SFTP connection instead. Chat to a Culture Amp Support Specialist to have your existing API setup removed and transition to SFTP. |
Missing Demographic Fields | The field you are attempting to map is a derived field or is not included in the Employee Census report accessible by the API. | Use Alternate Field: Use an alternate field that contains similar data or update outside of ADP through a manual user import. |
Terminated Employees Still Showing as "Active" | The employee was removed from the ADP sync report or deactivated without a populated End Date. | Immediate Fix: Re-add the user to the ADP report with a valid End Date and sync again. Secondary Fix: If they cannot be re-added to the report, reach out to our Culture Amp Support team (via "Ask a Person") to request a manual sync to process the deactivation. |
Need to Edit/Delete Mappings | Mappings are locked in the Culture Amp platform once set up. Adding or editing custom mappings often requires a full back-end sync to be triggered by our Culture Amp support team for the changes to be reflected in the platform. | Contact Culture Amp Support:
|
"Not enough security questions" | Incompatible ADP Security Configuration. | Switch to SFTP: This is a permanent technical limitation for certain ADP instances. Reply with "Ask a Person" to transition to the SFTP connection. |
Missing Manager Hierarchy | The "Reports To Email" column is missing or blank in ADP Workforce Now. | Check Report: Ensure the person assigned as the manager has a valid work email populated in ADP and that the "Reports To Email" column is included in your Standard Census Report. |
Missing a daily sync | Occasionally, minor technical delays can cause a daily sync to be skipped | Wait or Manual Sync: Most often, the sync will resume automatically the following day. If you need the data updated immediately, you can run a manual sync by clicking "Import data" on your Integrations page. |
Switching From CSV or Other Imports
Switching From CSV or Other Imports
If you are moving from CSV uploads or a different integration, keep the following in mind:
Demographic Consistency: When mapping fields, you must map the data to the exact same demographic field you used historically (e.g., mapping to "TEAM" is different from mapping to "TEAM NAME"). Using an incorrect or slightly different title risks discontinuity in your trended survey results.
Recommended Action: To avoid confusion, we recommend navigating to Settings > Employee Data Demographics and deleting the old, unused demographics after your first successful sync. (This won't impact any previous survey results.)
Handling Duplicate Employees
Handling Duplicate Employees
Culture Amp uses two fields as unique identifiers for user profiles: Email and Employee ID.
As long as at least one of these remains consistent between ADP Workforce Now and Culture Amp, the sync will successfully update the existing profile rather than creating a new one.
Duplicate Risk: If you change both the Email and the Employee ID simultaneously in ADP Workforce Now, the sync will not find a match and will create a duplicate profile.
If you see a duplicate profile error flag during your import, take the following steps:
Scenario | Action to Take |
A. Before Changes Are Applied | During the first sync review screen, stop the sync. Update the employee emails in Culture Amp to match those in ADP Workforce Now.
|
B. After Changes Are Applied | To clean up the duplicated profiles:
|
Further Guidance | Check out our dedicated support guide for further information on duplicate employee clean-up. |
Sync Blocked to Protect Employee Privacy
Sync Blocked to Protect Employee Privacy
Your automated daily sync might be blocked if Culture Amp detects a high-risk change for an employee. You will receive an email notification if this occurs.
When It Happens: The sync is blocked if a combination of an employee's Name, Date of Birth, or Email is changed simultaneously.
Purpose: This prevents one employee from accidentally getting access to another employee's private information (like performance reviews).
Fix: If you've intentionally changed the employee's details, you can run a manual sync to push the change through. Go to Settings > Employee Data > Users, click Import data, and select Sync. Culture Amp will guide you through the rest.
Redaction of Sensitive Data
Redaction of Sensitive Data
As part of this integration, Culture Amp has the ability to redact sensitive data at your request. If you need any fields to be disabled/redacted for your account, please reply with "Ask a Person" in a Support Conversation to speak with a Product Support Specialist.
💬 Need help? Just reply with "Ask a Person" in a support conversation to speak with a Product Support Specialist.